Commercial Kitchen Renovation: Costs, Code and Phasing
Plan a commercial kitchen renovation with budget ranges, ventilation and code requirements, and phasing tips that keep your kitchen open during work.
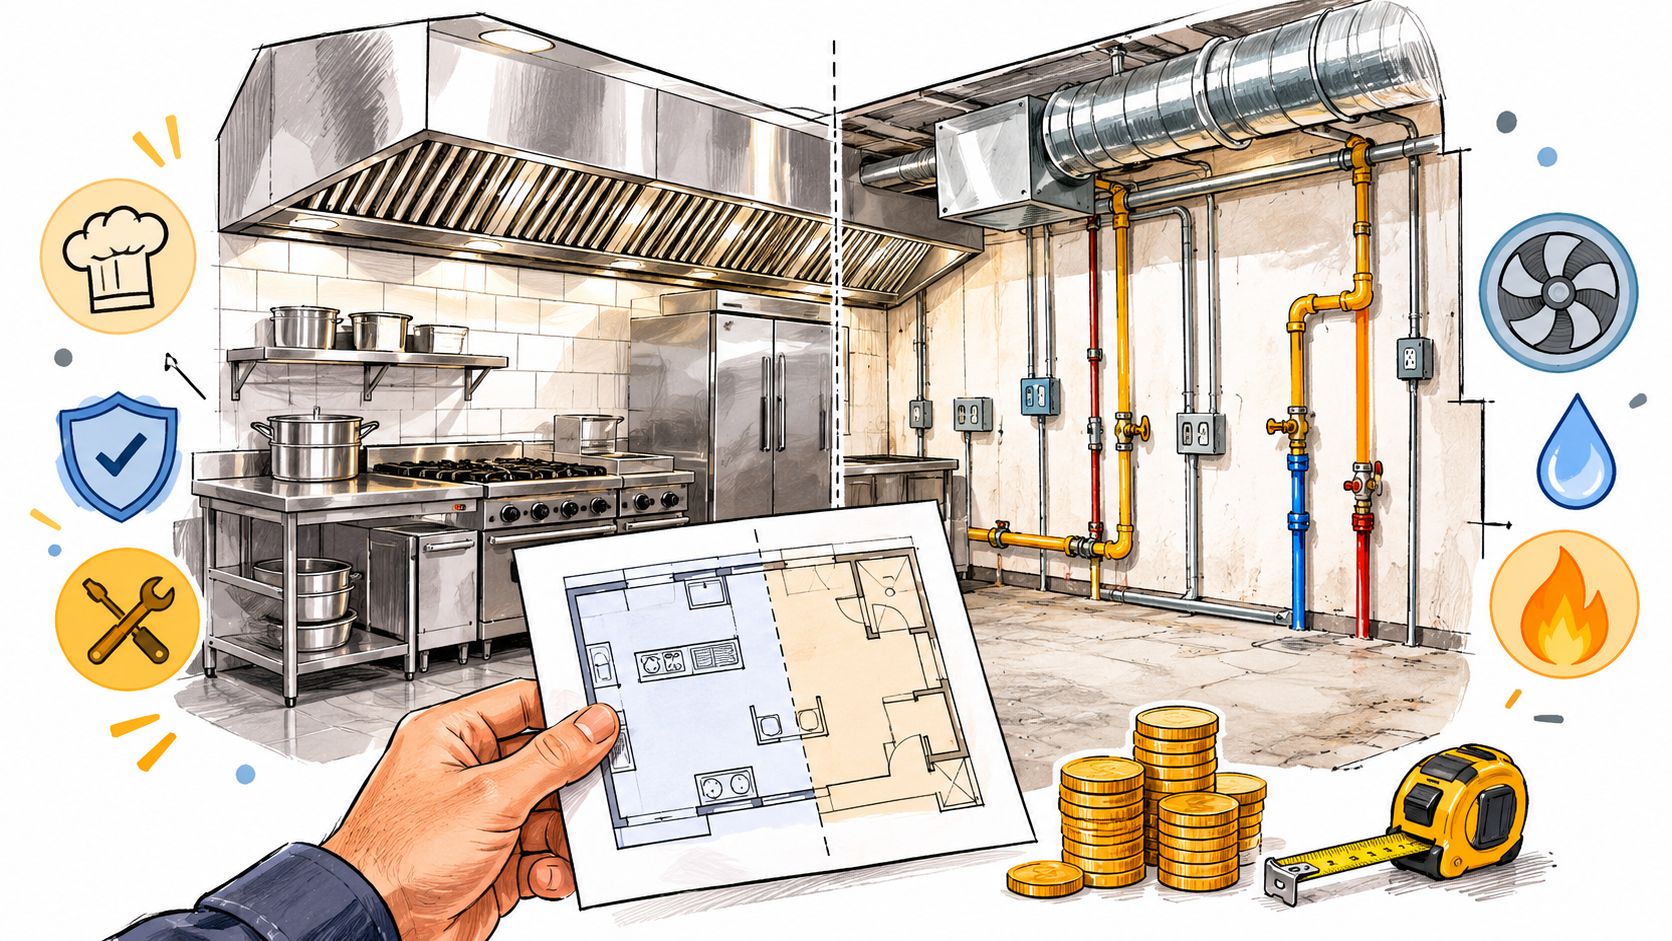
Your cookline still works, after a fashion. The fryer takes forever to recover, the walk-in sweats on warm nights, and your hood leaves a faint grease perfume on everyone's shirt. So you price new equipment, feel briefly in control, and then someone asks the dangerous question. Can we just move that fryer a few feet? That's where a commercial kitchen renovation stops being a shopping trip. One move drags power, gas, drainage, exhaust, fire suppression and your reopening date with it. Price those systems together, and price the lost service beside them, or your budget's already fictional.
Commercial Kitchen Renovation Costs at a Glance
Say you get a tidy quote to shift a fryer down the line. Then the electrician opens the panel and goes quiet. The new spot needs a feed that does not exist, the hood coverage changes, and a simple move is suddenly buying conduit, breakers, patching and an inspection. That is kitchen math. The appliance is rarely the expensive part. The infrastructure behind it is.
| Cost item | Typical range | Share of total | Main cost driver |
|---|---|---|---|
| Traditional commercial kitchen construction | USD 250 to 500 per sq ft | Base construction cost | Size and finish level |
| Complete project | USD 100,000 to over USD 1 million | 100% of project budget | Size and complexity |
| Equipment | Set by equipment schedule | 40 to 60% of total cost | Equipment count, duty level and utility hookups |
| Mechanical, electrical and plumbing | Priced as its own scope | 20 to 30% of total cost | Capacity, routing and grease management |
Those ranges come from a construction-industry estimate of commercial kitchen construction and hidden costs, which places traditional construction at roughly USD 250 to 500 per square foot and complete projects from about USD 100,000 to more than USD 1 million. Equipment can take 40 to 60% of the total, and mechanical, electrical and plumbing can add another 20 to 30%. What no contractor's bid will show you is the cost of the days the kitchen stays dark. That number lives in your own sales reports, and it deserves a seat at the same table as the construction figure.
Why One Move Costs Like Six
Move an appliance and you don't just move stainless steel. You can trigger new electrical capacity, gas lines, water and waste connections, grease management, exhaust routing and fire-protection changes. Power and ventilation behave as one system here. Add load on one side and the other has to answer for it, usually in writing, on a permit drawing.
That is why I would never let a contractor bury MEP work inside a vague "kitchen remodel" allowance. If it isn't its own line, it isn't really priced. It's a surprise with a due date.
Location piles on. Urban work can carry tight loading access, limited elevator windows, after-hours rules and inspectors who have seen every shortcut twice. Even hauling demolition debris gets slower when the dumpster needs a permit and a prayer. Every constraint stretches the calendar, and every extra closed day comes straight out of your revenue.
Practical rule: If a quote can't show you what happens behind the wall and above the ceiling, it isn't a renovation quote yet. It's a furniture list.
The Overrun Is Not Bad Luck
Overruns in kitchens have a pattern. Someone assumes the existing gas line is big enough. Someone else assumes the hood can stretch. A third person discovers the floor drain goes exactly where optimism said it wouldn't. None of that is mysterious. It is unverified scope meeting a hard opening date, and every day the fix takes is a day the dining room stays closed.
Your contingency shouldn't be a round number you picked because it felt responsible. Size it to the risk in your building. An older space with undocumented utilities deserves more protection than a recent build with clean as-built drawings and spare panel capacity.
Do three things this week, before demolition is quoted:
- List every equipment item: Write down its utility need, connection point and whether it is staying, moving or being replaced.
- Price MEP separately: Make electrical, plumbing, gas, grease and ventilation their own budget lines, each with its own assumptions and its own shutdown window.
- Hold real contingency: Keep money aside for the conditions you cannot see until walls and ceilings open, and don't spend it early on nicer finishes.
That discipline will not make the project cheap. It makes the expensive parts show up while you can still decide, rather than after the old kitchen is in a dumpster.
Equipment Schedule and Utility Needs
Build your equipment schedule before any trade prices anything. Not a wish list. A schedule. Every appliance sets a duty level, a utility load and a cost downstream, so a vague list produces vague bids and very specific change orders.
Cooking gear drives much of that money. One industry analysis of the global commercial foodservice-equipment market identified cooking equipment as the largest category at about 32% of market value in 2025. You're not buying in a sleepy corner of the economy either. In Bar & Restaurant's 2025 State of the Industry Survey, 53% of surveyed bar and restaurant operators identified kitchen equipment as an intended investment category. Popular gear still won't fit your room by magic.
Walk the Line in Food Order
Start where deliveries enter and finish at the pass. That order catches missing sinks, impossible turns and equipment that looks fine on a catalog page but blocks a real cook carrying a hot pan.
- Receiving and storage: Note walk-in and dry storage, refrigeration load, dedicated power and door swing. A walk-in that fits on paper but can't be delivered through the corridor is an expensive sculpture.
- Prep: List sinks, tables, slicers and mixers, plus water, drains and circuits for each station. Small plug loads add up fast when three prep cooks start at once.
- Cooking: Record ranges, fryers, ovens, combi ovens and grills with gas or electric feed, heat output and hood coverage. This row drives your ventilation and service capacity, so don't guess.
- Warewashing: Include the dish machine and pre-rinse, hot water demand, drainage and steam load. A fast machine starved of hot water is just a noisy rinse tunnel.
- Holding and service: Add hot holding and beverage units with dedicated circuits where needed, so the pass doesn't trip a breaker during the rush.
For each item, record duty level, utility type and size, gas or electric status, hood requirement and the exact wall or floor point it needs. If you're borrowing layout ideas from practical kitchen design tips, translate every pretty idea into those fields before you fall in love with it.
Mark replacements separately from relocations. A like-for-like swap in the same footprint can often reuse feeds and hood coverage. A relocation pulls new lines through finished surfaces and invites every trade to revisit the room. That distinction is money.
Then freeze the schedule. Switch a gas range to induction later and you've changed electrical load, heat rejection, hood demand and possibly make-up air. You can still make that change, but make it on paper, where it's cheap, not after rough-in, where it's educational.
Matching Hood Airflow to Equipment Duty Level
"I'll just put in a standard exhaust fan" is how owners end up with a dining room that smells like a fryer and a kitchen door that fights back. There isn't a standard fan for your cookline. Exhaust is sized to appliance duty, hood type and hood length, and every cfm you pull out has to be replaced, conditioned and paid for.
Guidance based on ASHRAE Standard 154 and the International Mechanical Code lists approximately 150 to 200 cfm per linear foot for light-duty wall-mounted canopy hoods, 200 to 300 for medium duty, 300 to 400 for heavy duty, and at least 400 for extra-heavy duty. The same standard treats Type II hoods, used over heat, steam or combustion equipment without significant grease output, as a separate case selected by the maximum appliance duty level and its net exhaust airflow rate.
| Duty level | Listed wall canopy (cfm per linear foot) | Unlisted single-island canopy (cfm per linear foot) |
|---|---|---|
| Light duty | 150 to 200 | 400 |
| Medium duty | 200 to 300 | 500 |
| Heavy duty | 300 to 400 | 600 |
| Extra-heavy duty | At least 400 | 700 |
Read that island column twice. An unlisted single-island canopy can demand roughly 400, 500, 600 or 700 cfm per linear foot across the same duty categories. Same menu, same cook, very different fan, duct and make-up air bill. Listing status is airflow, equipment size and operating cost rolled into one line on the submittal.
Too Little Air, Too Much Air
Undersize the exhaust and grease, smoke, heat and condensation spill into the room. Cooks work hotter, ceilings get filthy, and moisture finds places you'd rather it didn't. Oversize it and you pay another way. Make-up air demand climbs, building pressure goes off balance, energy use rises, and you can get doors that won't close or combustion appliances that misbehave.
A hood doesn't just remove air. It decides how much replacement air you must bring in, condition and pay for every service.
That balance is why hood, make-up air and fire suppression belong in one conversation, priced next to the electrical capacity those fans will draw. A bigger hood can mean a bigger motor, a bigger circuit and a bigger panel load, so the airflow decision lands on the electrical budget too. Treat them as separate bargains and they'll meet for the first time above your ceiling. It won't be a friendly introduction.
Run the Four-Step Check
- Pull the appliance lineup: Your equipment schedule already lists what each unit emits. Carry the heat, steam and grease loads straight into the hood calculation.
- Assign a duty level: Classify each appliance before you pick a hood, not after the duct route is drawn.
- Confirm listing status: Verify whether each hood is listed or unlisted, because that changes the required airflow per linear foot.
- Size the system together: Coordinate exhaust, make-up air and fire suppression, then get mechanical-code approval before ceiling and utility layouts are fixed. Add a column for downtime: hood swaps and duct reroutes over a live line are shutdown work, so sequence them the same way you price them.
Pay special attention to mixed lines. A steamer under a Type II hood is one problem. A charbroiler sharing the same canopy is another. Any grease-producing equipment on your schedule needs its own hood classification and airflow check before the layout hardens.
Change the hood length and the airflow requirement changes with it. Change the appliance under it and the duty may change too. Re-run the numbers after every layout change, even the "small" ones. Especially the small ones. That's how budgets survive contact with a tape measure.
Food-Safety Rules That Shape Finishes and Sinks
Pick tile after the health code has had its say, not before. In a commercial kitchen renovation, surfaces, sink positions and airflow paths aren't decorating choices. They're compliance choices that your staff will either clean easily or fight every night.
The FDA Food Code requires indoor floors, walls and ceilings in food-operation areas to be smooth, durable and easily cleanable. It also requires moisture-exposed zones such as food preparation, walk-in refrigeration and warewashing areas to use nonabsorbent materials. Handwashing sinks must remain accessible and can't be substituted with food-preparation or warewashing sinks. The same code requires ventilation to prevent intake and exhaust air from contaminating food, food-contact surfaces, equipment or utensils, with mechanical ventilation sufficient to control excessive heat, steam, condensation, vapors, odors, smoke and fumes.
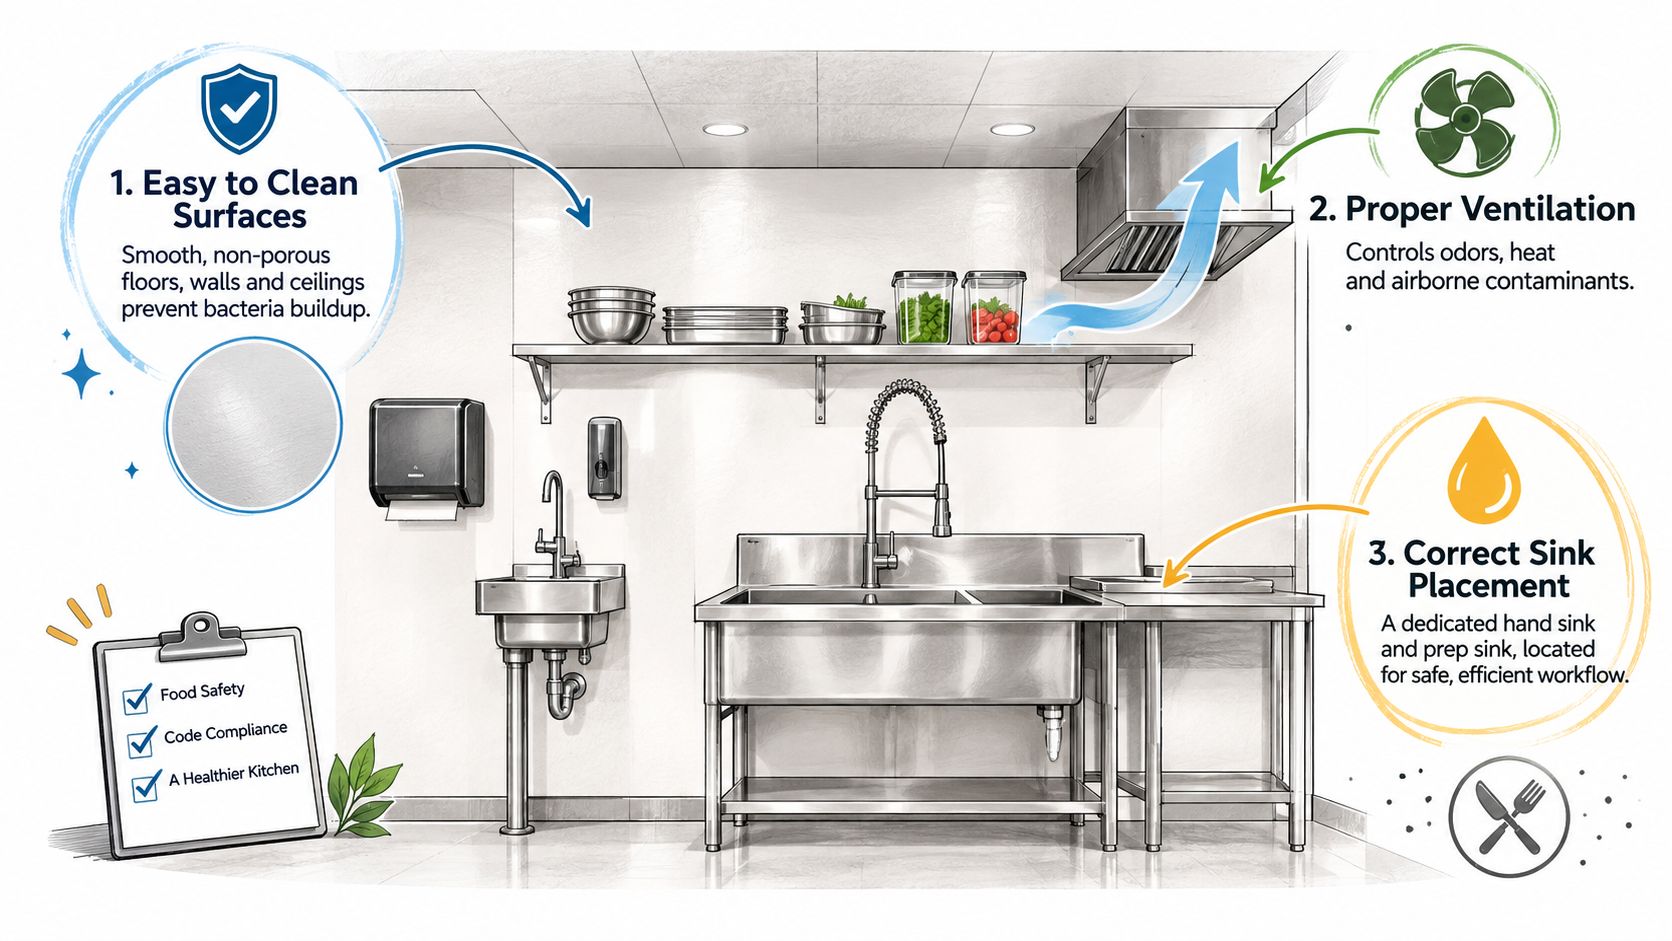
Porous or heavily textured finishes look great in a rendering and hold moisture like a grudge. They add sanitation work and invite damage in wet zones. A handwash sink tucked behind stored sheet pans might satisfy a drawing, but it won't satisfy a busy cook. Put help far away and people invent shortcuts. That's not a character flaw. That's design.
Airflow placement matters just as much. Exhaust discharge or make-up air inlets near food zones can create contamination pathways, so don't let duct convenience decide where air enters and leaves. The same discipline applies in wet commercial rooms generally, which is why the planning logic behind a commercial bathroom remodel also starts with durable, cleanable surfaces and sensible access, not fixtures first.
Use this checklist on the plan:
- Map every flow: Draw handwashing, preparation, cooking, warewashing, waste and storage on one plan so crossings are visible.
- Seal wet areas: Specify sealed, nonabsorbent finishes wherever water, steam or washdown is routine.
- Protect sink access: Keep a clear, unobstructed path to each handwash sink during a busy service, not just on opening morning.
- Make service possible: Place filters, ducts and exhaust components where a technician can reach them without removing a ceiling.
Now run the plate test. Trace one plate from raw delivery to storage, prep, cooking and the pass. Count how many times it crosses a dirty path carrying waste or used ware. Every crossing is a question your layout has to answer before an inspector asks it less politely.
Electrical Capacity You Must Verify Before Demolition
"Going electric" isn't swapping a gas range for an induction top and calling it modern. It's a service-capacity problem first and an appliance choice second. If the building can't feed the new line, your shiny equipment is just well-lit storage.
California makes the point hard to ignore. State guidance in the California Energy Commission Blueprint newsletter explains that the 2025 California Energy Code adds mandatory electric-readiness requirements for newly constructed commercial kitchens, including kitchens that still use gas or propane. The same guidance indicates the cookline panel may require up to 800-amp capacity, while branch circuits must meet minimum 50-amp ratings in applicable configurations.
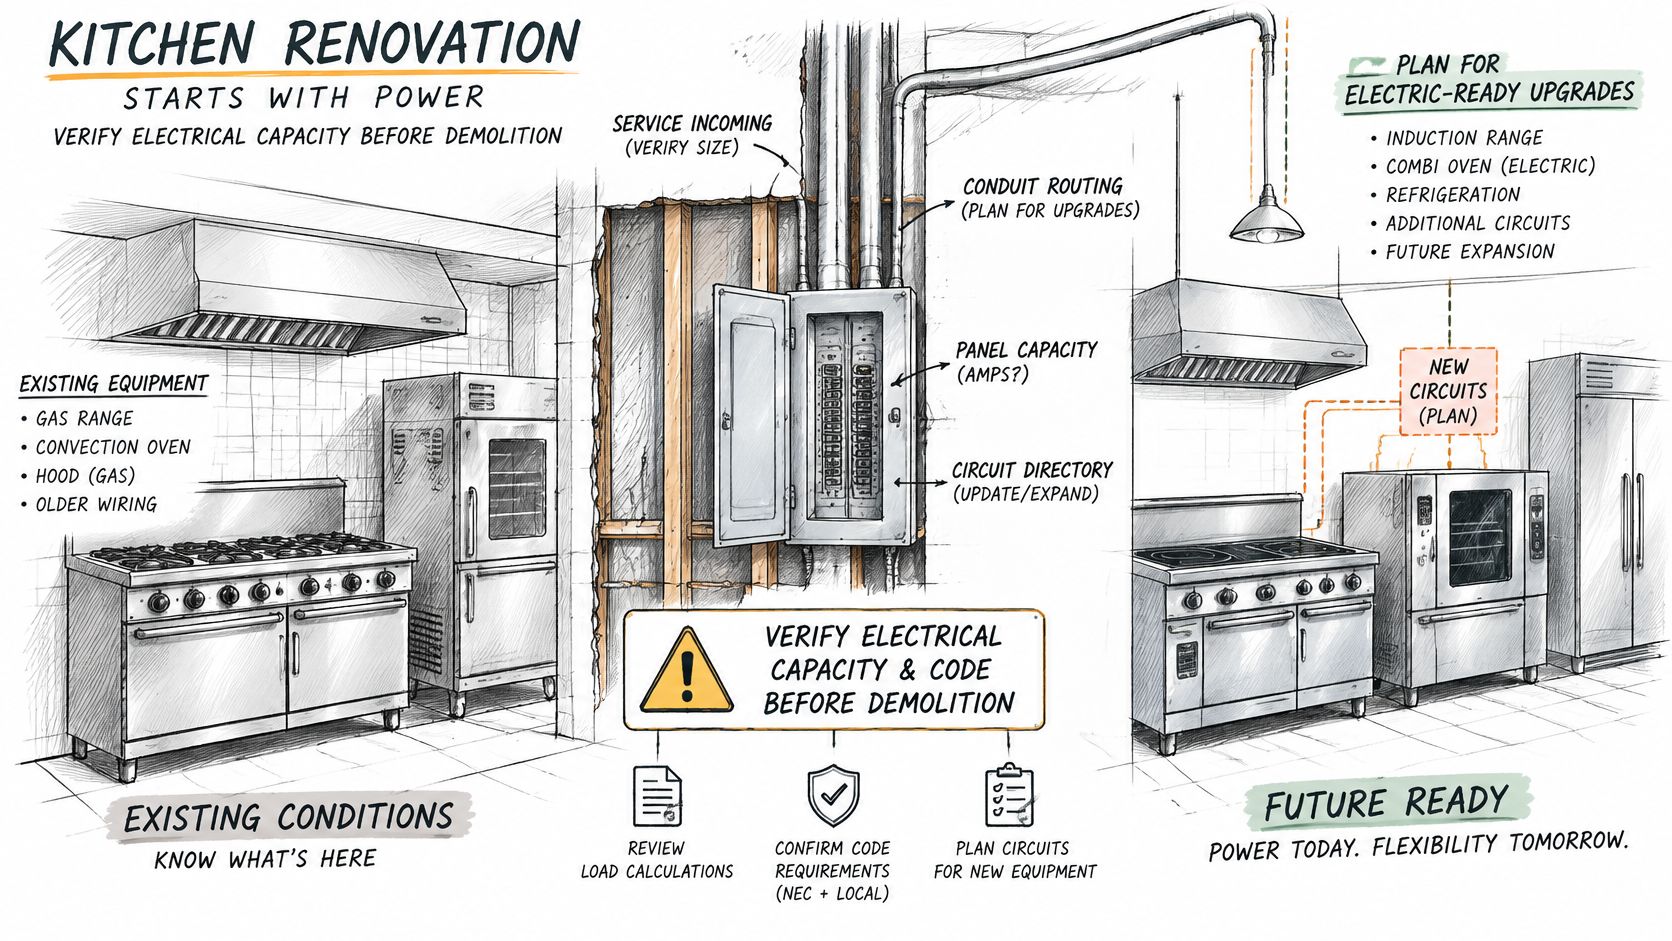
Read that scope carefully. Those electric-readiness rules are written for newly constructed commercial kitchens. Don't assume they apply the same way to your renovation, and don't assume they don't. Confirm with your plan reviewer which requirements apply before you design around either answer. Gas equipment can still require electric-ready infrastructure where the rule applies.
The Older Building Problem
Tenant improvements in older buildings are where this gets expensive. One service upgrade can trigger utility lead times, service-room work, structural penetrations or a lease renegotiation with a landlord who suddenly cares a great deal about conduit. None of that appears in an appliance catalog.
Think of electrical capacity like the water main in an old building. You only learn it's too small when the dishwasher, the induction line and the new combi oven all run at the dinner rush. By then, your options are slow, disruptive or both.
Check before demolition: Transformer capacity, panel space, feeder routing, utility coordination, heat rejection and the loads you expect to add within the next few years.
Map present loads and future loads on the same sheet. If a second combi oven is a realistic growth step, say so now while walls are open. Spare capacity planned early is boring. Spare capacity added later involves saws.
Coordinate the electrical design with hood, make-up air and fire suppression as one system. Electric cooking changes heat in the room and can change ventilation assumptions, while fans, controls and suppression all need power and clear routing. Separate drawings that don't talk to each other produce one very talkative job site.
I would judge electrification by building capacity and operating profile, not appliance price alone. It can reduce combustion and may lower operating costs, but it can also raise upfront infrastructure cost and complexity. Both things can be true. Your job is to find out which one matters more in your building, before demolition makes the decision for you.
Sequence the Work Without Losing Service
The cheapest construction sequence can be the most expensive business decision you make. A single full shutdown looks tidy on a contractor's schedule. It looks less tidy when rent, payroll and regulars keep moving while your kitchen doesn't. Treat downtime as an engineering deliverable, with a price beside every scope.
Run the work in this order:
- Survey first: Verify utilities, grease and exhaust paths, and the structure above the ceiling before anyone promises a route.
- Lock the schedule: Freeze equipment, duty levels and utility needs so trades price the same kitchen.
- Finalize the layout: Confirm food-safety flows and the electrical load plan together, not in separate meetings.
- Permit the system: Submit for permits and get mechanical-code approval for hood, make-up air and fire suppression.
- Order long-lead gear: Release equipment and electrical gear early, because lead times dictate the schedule whether you like it or not.
- Demolish in phases: Open only what the next rough-in needs, starting with hoods, gas, grease and power.
- Set and test: Place equipment, then test airflow, fire suppression and water before finishes close access.
- Commission each line: Prove every station under working conditions before reopening, while fixes are still construction tasks and not customer apologies.
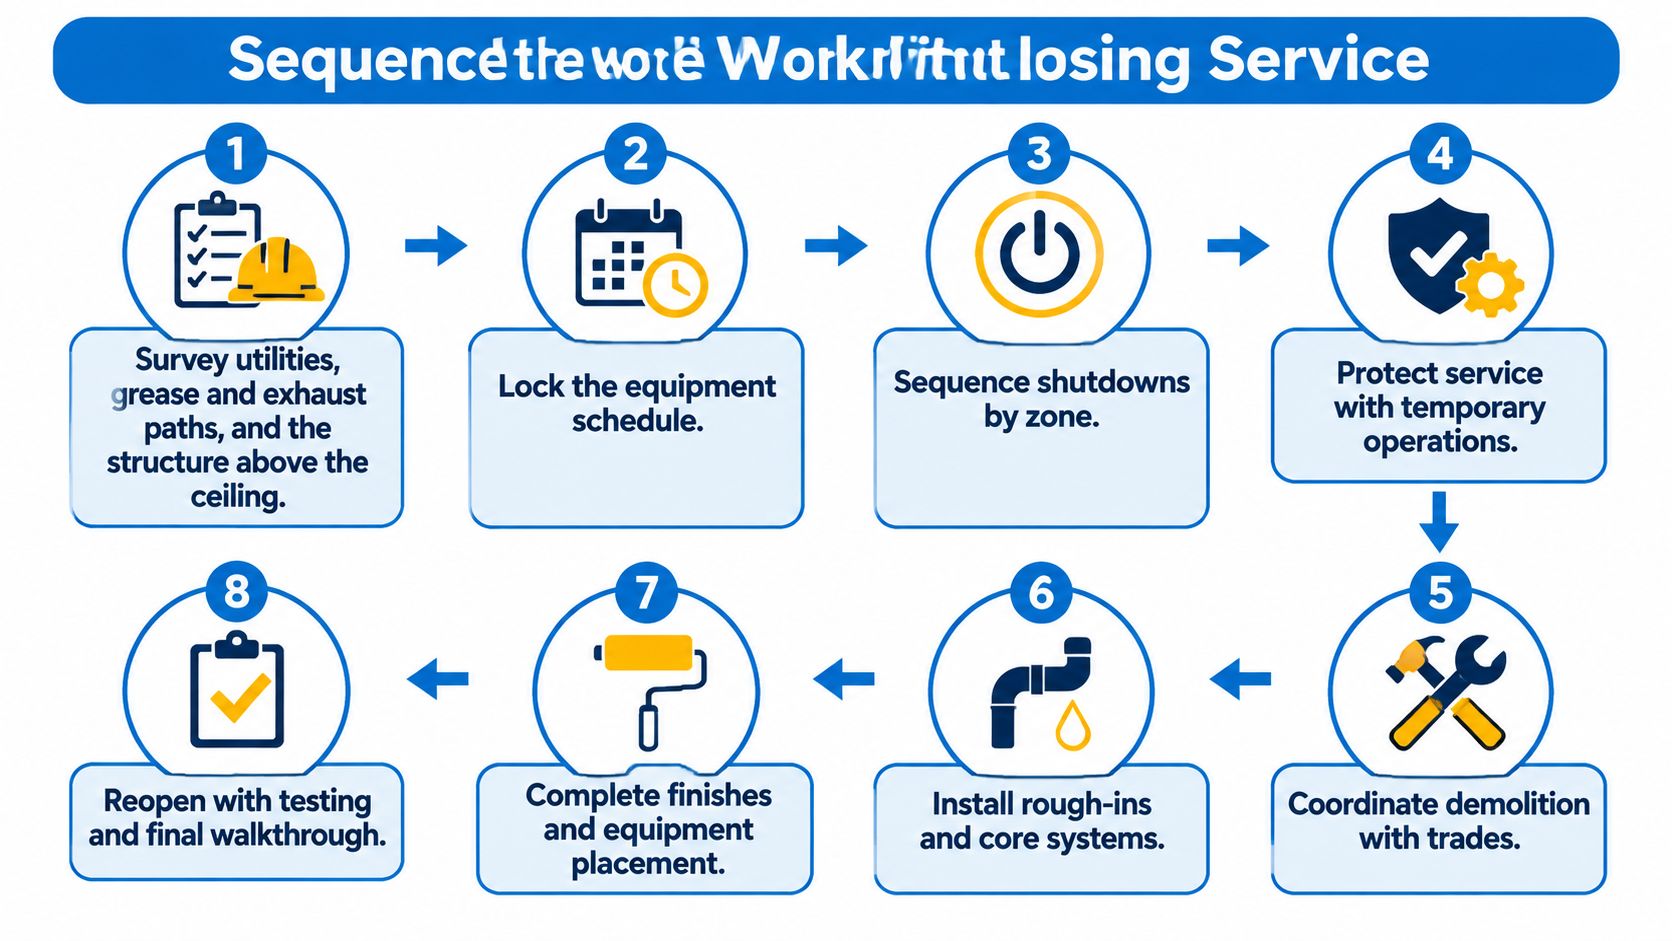
Two slips cause outsized pain. Order the hood after ceilings close and you've bought a second demolition. Skip the airflow test and the fault introduces itself on your first busy night, in front of witnesses holding menus. A tight kitchen remodel checklist helps, but only if someone owns each gate and refuses to wave work past it.
Price the Outage Beside the Work
| Scope | Temporary workaround | Inspection or test |
|---|---|---|
| Hood replacement | Phase the swap so one cooking line stays on | Airflow and make-up air test |
| Grease waste | Temporary grease handling during rough-in | Grease system inspection |
| Refrigeration | Stage cold storage before the walk-in is pulled | Temperature check before restocking |
| Electrical service | Work after hours or on a planned shutdown day | Utility and panel inspection |
| Fire suppression | Schedule with hood work in one window | Fire suppression acceptance test |
| Flooring | Work in sections so prep areas stay open | Surface and drainage check |
Use the table as a business tool, not a formality. If keeping a second cooking line running costs more in construction but protects your strongest service, it may be the cheaper plan in total. Temporary utilities, modular equipment, staged cold storage and noisy or wet work outside peak hours all belong in that comparison. Revenue lost is still a project cost. It just doesn't arrive as an invoice.
Ventilation decisions belong in the same phasing plan. California materials summarized in a California Energy Commission filing on specialized kitchen ventilation requirements identify kitchens with total hood exhaust above 5,000 cubic feet per minute as subject to specialized ventilation requirements, with compliance pathways involving demand-controlled ventilation, transfer air, energy recovery, or reduced conditioning of makeup air. Industry coverage in that material reports demand-controlled ventilation can reduce fan energy use by roughly 30% to 60%.
Don't buy those savings blind. Controls need commissioning, sensors need calibration, and a badly sequenced install can interrupt service. If the team can't test and tune the system before reopening, the promised efficiency is a brochure claim, not an operating result.
Design ventilation compliance and production continuity together. The hood scope decides when cooking stops. The electrical scope decides when everything stops. The flooring scope decides where anyone can stand. Sequence them as one operation, with reopening tests named in advance, and your phased plan has a chance. Sequence them as separate contractor errands and you'll get a very expensive lesson in coordination.
Lock Your Scope and Book a Site Review
Demolition starts after the scope is locked. Locked on paper, with names and numbers attached. "We'll figure it out once it's open" is a billing method wearing a plan's clothes.
Price each scope's shutdown next to its construction cost before anyone signs. A hood swap that closes the line for two Fridays costs more than the ductwork. A panel upgrade that darkens the kitchen overnight costs more than the wire. Put the outage, the workaround, and the reopening test on the same line as the price, or the cheap bid wins on paper and bills you later.
Have these in hand first:
- Equipment schedule: every item with duty level, utility size, and connection point.
- Hood and makeup air plan: airflow matched to the final line, fire suppression coordinated.
- Electrical capacity check: existing service verified against present and future loads.
- Food-safety flow map: clean and dirty paths drawn so crossings happen by design.
- Phasing plan: each scope paired with its outage, workaround, and reopening test.
You can work through that list yourself and it will still save you money. If you'd rather have one accountable team own the coordination, Epic Remodeling is a licensed and insured general contractor, CSLB #1095347, and assigns a dedicated project manager who supervises and assists from the start of the project to completion.
Bring the equipment list to the site review. Bring your doubts about the panel and the hood too. Those aren't awkward questions. They're the job.
Want the hood, electrical capacity, and phasing priced as one system before demolition starts? Epic Remodeling can walk your space, lock the scope around your equipment schedule, and coordinate the trades under one project manager, with a complimentary estimate covering all labor and materials. Book your free consultation through the contact form or by calling 949-594-6444 to get a site review on the calendar.