Raised Ranch Kitchen Wall Removal, Step by Step
Raised ranch kitchen wall removal starts with loads, permits, and hidden utilities. Compare costs and three layout choices before demo.
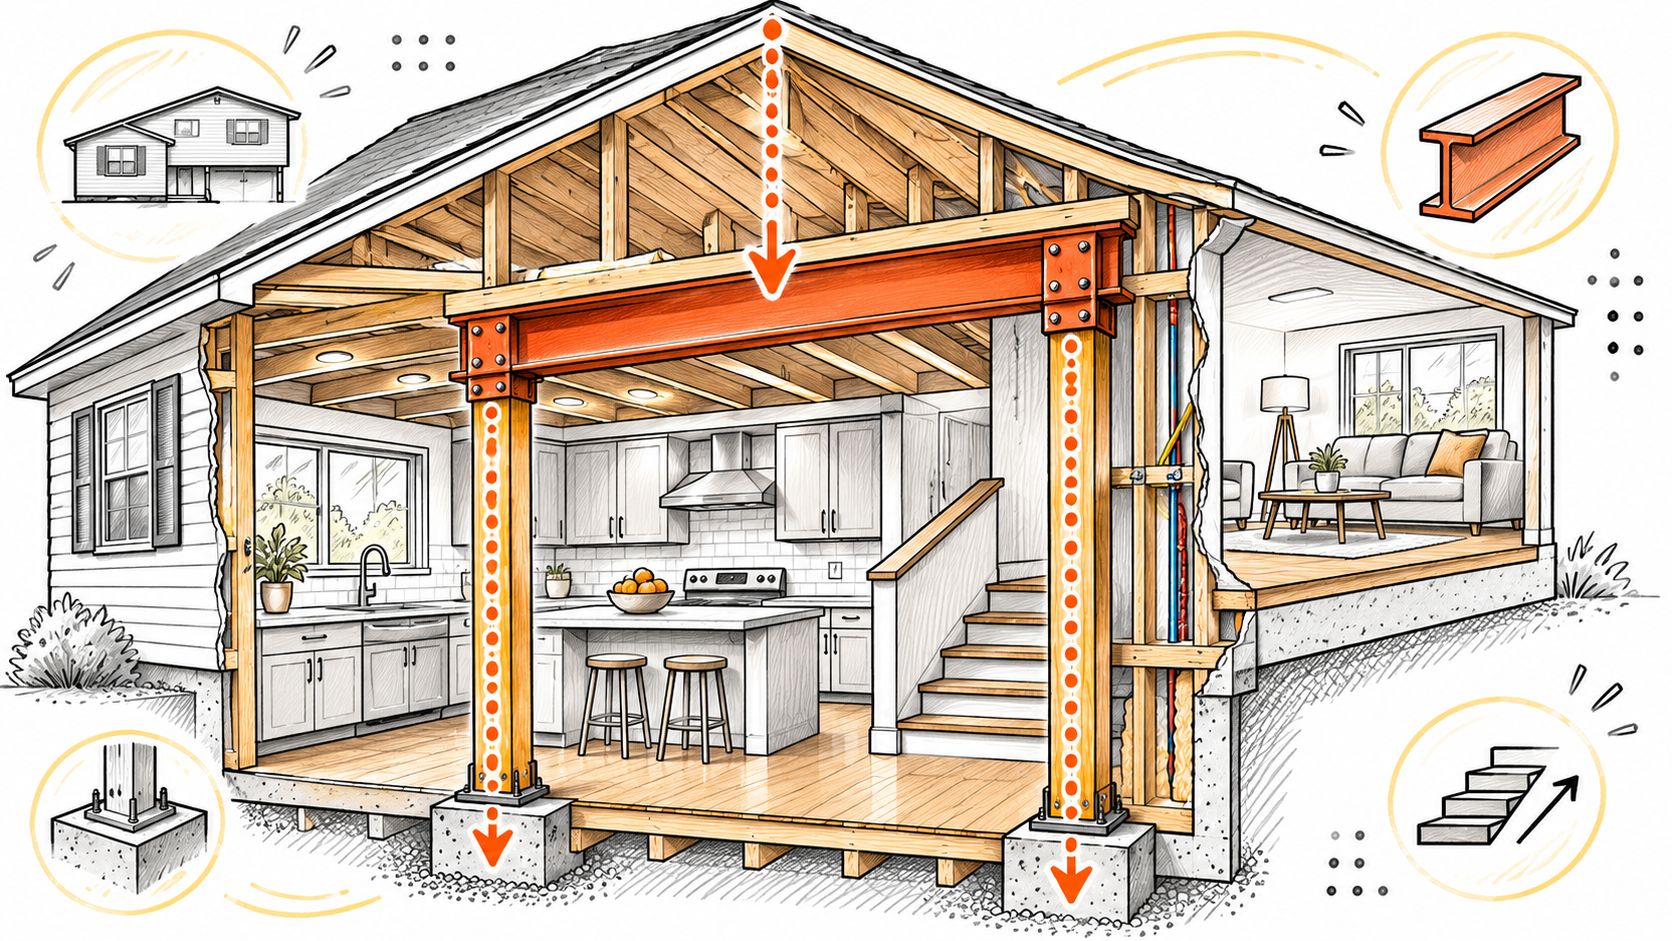
Ask around about raised ranch kitchen wall removal and the same advice comes back: find out whether the wall is load-bearing, then either take it out or hang a beam where it stood. It sounds like the complete answer. It covers maybe a third of the job.
That rule was written for a flat, single-story ranch. A raised ranch stacks half-levels around a central stair, so the kitchen wall may be holding up a bedroom floor, landing on a crawlspace beam that was never sized for a point load, bracing the house against sideways movement, or wrapping a duct that serves two floors. The beam is the part you can see on the bid. The other three are where budgets come apart.
So take it in order: what the work costs, why the load path matters more than the span, what has to be permitted and checked before demolition, which hidden systems decide the opening, and which of three openings fits your house.
The order that works: engineer the load path, map the utilities, permit the scope, and only then choose how wide the kitchen opens. The beam is the last decision, not the first.
Raised Ranch Kitchen Wall Removal Costs at a Glance
The popular line about opening a kitchen is that a non-bearing wall is cheap and a bearing wall costs a few thousand more. That assumes one floor, one roof plane, and a straight shot from ceiling to dirt. A raised ranch puts the kitchen a few steps from the living room while a bedroom floor sits a few feet above the ceiling. Plan the opening in the multi-story band until an engineer proves otherwise.
The reported numbers support that instinct. HomeGuide's 2025 cost guide puts removing a load-bearing wall in a single-story house at $4,000 to $10,000, against $9,000 to $15,000 in a multi-story house. Those ranges cover the opening itself, beam, posts, labor, and the framing that goes with them. They don't cover the kitchen around the hole.
| Scope | Reported range | What it covers | How to use it |
|---|---|---|---|
| Load-bearing wall, about 120 sq ft | About $6,760, near $56 per sq ft | Beam, posts, and related labor in a 2024 average | A per-foot sanity check, not a local bid |
| Single-story load-bearing removal | $4,000 to $10,000 | Opening one level in 2025 reporting | Only if engineering shows no stacked loads |
| Multi-story load-bearing removal | $9,000 to $15,000 | Opening where upper structure bears on the wall | Default planning band for a raised ranch |
| Major kitchen renovation | About $20,000 to $65,000 | Layout, cabinets, and finishes beyond the wall | Use when the opening triggers a real kitchen redo |
| Full gut kitchen remodel | About $65,000 to $130,000 or more | Strip and rebuild of the kitchen | Use when utilities and finishes all move |
| Permits and inspections | $500 to $2,000 or more | Plan review and required inspections | Add on top; local fees vary |
The per-square-foot row is your reality check. The Spruce's 2024 cost report puts load-bearing wall removal at an average of $6,760 for 120 square feet, about $56 per square foot. Run your opening's width against that before you accept any bid, then remember what the number excludes: patching drywall, weaving flooring across the old wall line, moving a duct, and the wiring a wider opening forces.
Where the wall price ends and the kitchen price starts
Then decide what happens to the room around the hole. Martha Stewart's 2025 kitchen remodeling cost reporting places major kitchen renovations broadly around $20,000 to $65,000, full gut remodels at $65,000 to $130,000 or more, and permits plus inspections at $500 to $2,000 or more. A wall removal that drags in new cabinets, a relocated sink, and a different lighting plan has become the first number, not the second.
If that's where you land, work backward from a kitchen remodel cost breakdown before the engineer's drawings arrive, so you know which finishes are negotiable and which structural lines aren't.
The short answer: a raised ranch kitchen wall can often come out, but only after an engineer confirms the load path and a utility map confirms where ducts, stacks, and wires run. Until both exist, carry the multi-story band in your budget and treat the single-story row as a hope, not a plan.
The Load Path and Beam Scheme Behind That Wall
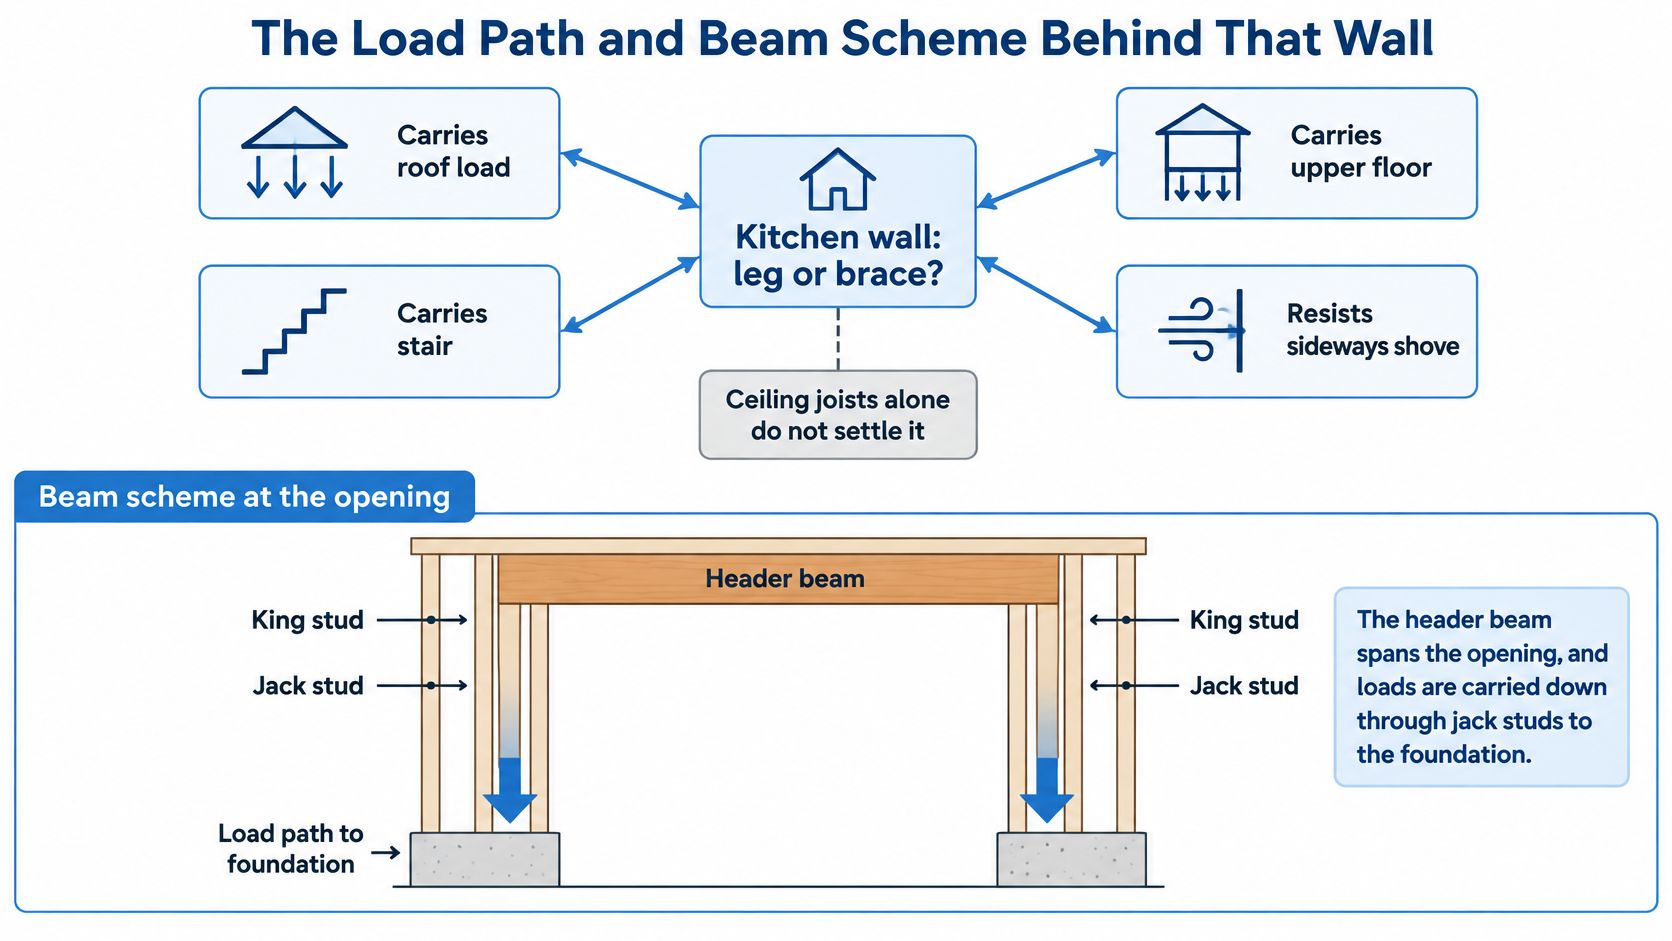
A wall in a raised ranch kitchen is doing one of two jobs, or both. It's a leg holding something up, or a brace resisting a sideways shove. FEMA's structural guidance identifies bearing walls and columns as primary vertical-support members, and notes that exterior walls can carry gravity loads while also providing primary resistance to lateral forces (FEMA Risk Management Series). Which job your wall has decides everything downstream.
The diagram below shows both roles and where the replacement beam has to deliver its load.
Walk the path from the roof down
Stop checking whether the wall holds the kitchen ceiling joists and start at the top of the house. The sequence runs like this:
- Roof and upper-floor framing. Find the ridge, the ceiling joists, and the floor joists of the level above. Note which direction they run and where they land.
- Beams and girders. A wall that looks nonbearing at kitchen level may be carrying a beam, a stair opening, or a concentrated point load from a partition above.
- Joist direction changes. In a split-level, framing can change direction within a few feet as the house steps down.
- Posts and their bearing. Every new post has to land on something that can take a concentrated load, not a single floor joist running the wrong way.
- Foundation, crawlspace beam, or slab. The expense often lies in the foundation. A footing that was never designed for a point load is a real line item.
Split-level geometry is what makes this investigation different from a flat ranch. One reference point notes that these houses can carry different framing directions, floor elevations, stair openings, dropped beams, posts, duct routes, and foundation conditions within a short distance, and that the replacement beam must transfer its loads through posts down to the foundation (Redfin's wall removal guide). The implication is uncomfortable but honest: a small opening that creates a new point load above a weak crawlspace beam can outprice a longer partition that carries nothing.
Flush beam or dropped beam
Both schemes work. They cost different things in headroom and carpentry.
A flush beam tucks into the depth of the existing joists so the ceiling plane stays flat. It usually means more reframing, more hangers, and precise pockets cut into the framing on each side, which is why it costs more labor. A dropped beam hangs below the joists. It's simpler where joists can't be cut, and it can double as a soffit to hide a duct, at the price of a bulkhead across your new sightline.
Every post needs adequate bearing length, a real mechanical connection to the beam, lateral restraint, and a continuous path down to a footing or slab. FEMA's guidance is blunt about how the sizing gets decided: compare stresses from expected loads against code-allowable capacities for each element, rather than trusting a look at the framing. The engineer should calculate reactions at the new posts and confirm the floor framing, crawlspace beam, footing, or slab can resist them. Where demolition would interrupt an active load path, a temporary shoring plan comes before the saw.
If you can't sketch the path from the ridge to the footing on one page, the wall isn't ready to come out.
A beam is also not a commodity. Its size, bearing length, connections, lateral restraint, and fire-protection details get designed for your actual span and loads, not chosen from a table at the lumber yard. Wood or steel is a design decision, made after the numbers.
Permits and Seismic Review Before Demolition
Permits are the order of operations, not paperwork you file after the sledgehammer comes out. Cities treat adding, moving, or removing walls as regulated alteration work, and the wall that looks identical before and after demolition can be carrying a roof, a floor, or an upper-level partition the whole time.
One example of how broadly that's applied: Salt Lake City's building permit guidance states that altering a building's structure, including adding or removing walls or changing the layout, usually requires a permit. Expect the same treatment from your local building department.
Here's the sequence to run before anyone touches drywall.
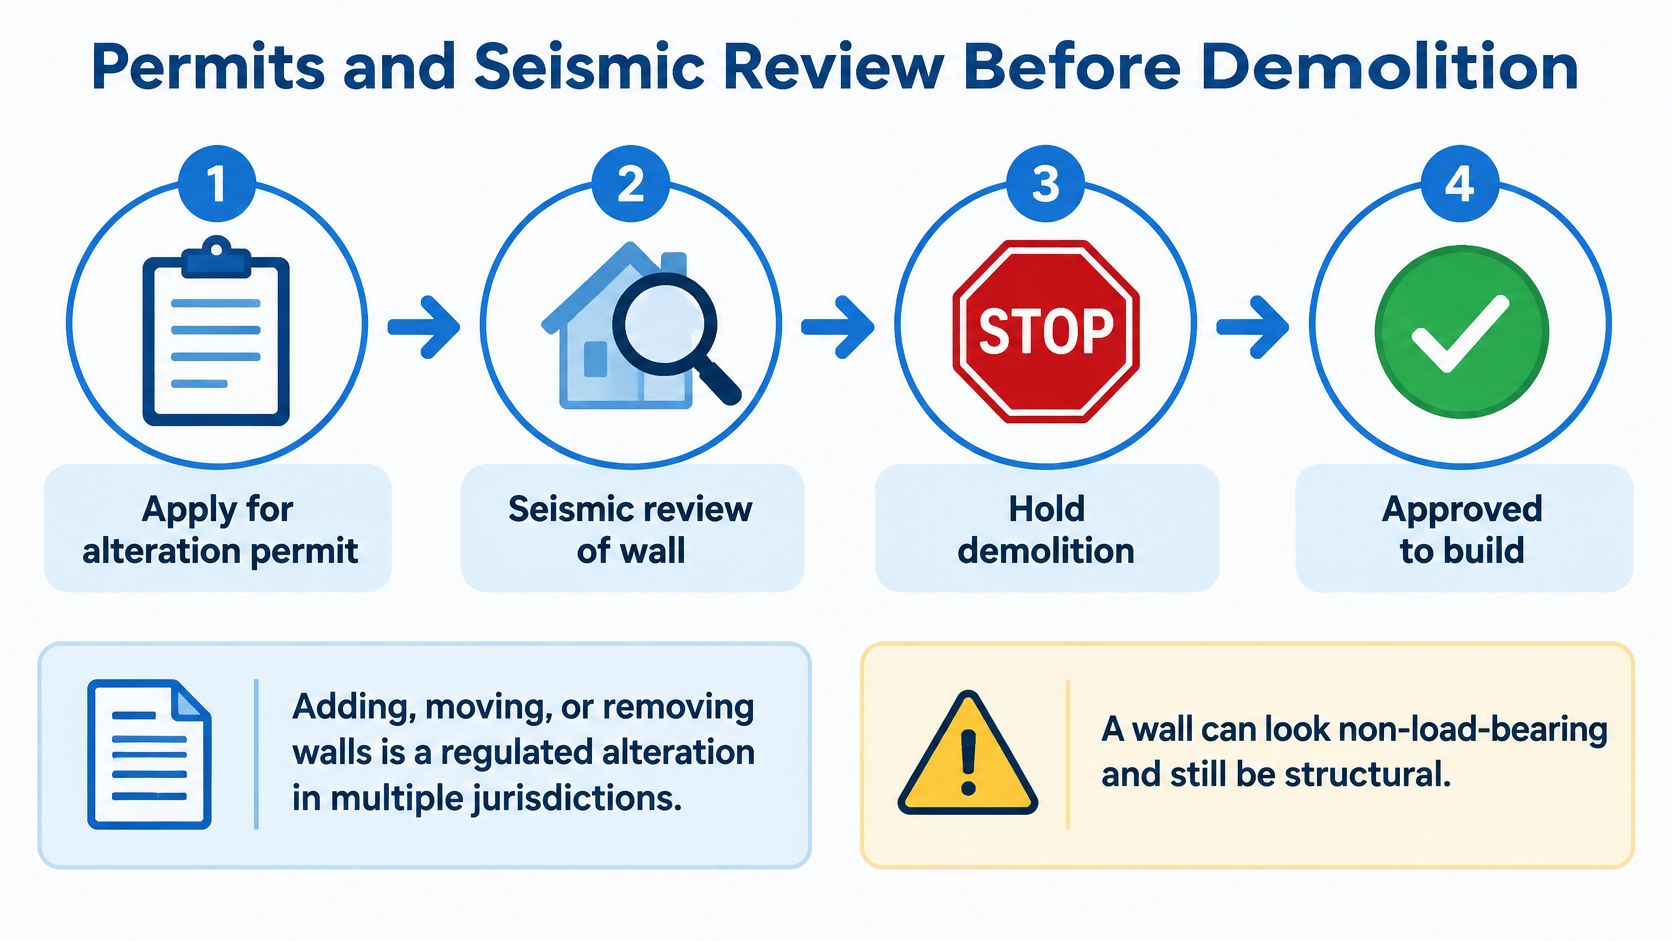
The five-step approval path
- Document what exists. Photograph and measure the framing and trace every utility in the wall. Attic, crawlspace, basement, and both sides of the kitchen.
- Classify the wall. Structural, part of the lateral system, or nonbearing. This is an engineering call, not a contractor's hunch.
- Get calculations where they're required. Bearing walls and anything in the seismic system need engineered drawings.
- Submit and receive approval before demolition. Plan review happens while cabinets are being ordered, so it doesn't have to cost you schedule.
- Follow the inspection list the permit issues. Rough framing, rough trades, and a final. Nothing gets covered before the rough inspections pass.
What seismic review adds in California
This is the part homeowners underestimate. California guidance states that alterations to existing buildings must comply with current code provisions applicable to the work, and state law defines seismic retrofitting as structural strengthening or other measures that reduce earthquake hazards and preserve safe occupant ingress and egress (California HCAI remodel advisory guide). Put plainly, a beam that removes a stretch of wood shear wall or a brace in the wall line is no longer just a gravity question.
The review should identify shear-wall segments, hold-downs, anchor bolts, collectors, diaphragm edges, and continuity down to the foundation. A wide kitchen opening may need engineered portal framing, moment-resisting components, or added shear elements somewhere else in the house so occupants still have a safe way out. In Los Angeles and Orange County, submittals commonly include demolition and framing plans, structural calculations where required, and details for posts, beam seats, connections, and temporary protection. If the remodeled kitchen changes how a room is used, accessibility rules can widen the review further.
Your city or county sets the final scope, not a forum post. Keep a kitchen remodel checklist beside the permit file so trade inspections and finish selections don't collide in week three.
Hard stop: no studs, no drywall, no demolition until permit scope, engineering, utility isolation, and inspection sequencing are all settled in writing.
Ducts Pipes and Wires That Decide the Opening
Here's the question homeowners ask a week too late: can the wall come out if the duct can't? In a raised ranch, the partition between kitchen and living space is often the vertical highway for the whole house. It runs between half-levels, and everything that needs to get from one to the other uses it.
Before you assume a beam is the whole bill, map what's inside the wall. A typical raised ranch partition can hide:
- A plumbing stack serving both levels, including the drain for a bathroom directly above the kitchen.
- A duct trunk sized for two floors, often running vertically in the same bay where you wanted the new opening.
- Wiring that travels between levels, including switch legs for stair lights and circuits shared with the lower family room.
- A gas line feeding the range or a lower-level appliance.
- A panel or utility chase that the electrical service depends on.
None of that shows up in a wall-removal estimate. All of it shows up in the change order.
The go or no-go rule: if the utility map shows a duct or stack that can't move, design the opening around it. An open-concept promise the mechanicals can't keep is how kitchens end up with a bulkhead nobody planned for.
Mark every pipe, wire, duct, and gas line on a wall elevation before the first cut, and carry a contingency line in the budget for what the plaster is hiding. In houses of this era, opening one wall routinely exposes a junction box with no cover, a drain with no venting, or a duct joint wrapped in tape that stopped sticking in the 1990s. Those are days of work, not hours.
Also plan on trade permits. Electrical, mechanical, plumbing, and gas work can each require their own permit or additional plan review, and that's true even when the wall itself carries no structural load. The beam is one scope. The systems are another, and they're priced by different trades on different days.
Keep the two conversations separate. Ask the engineer what the structure allows. Ask the trades what the systems allow. The opening you build is the smaller of the two answers.
Full Opening Partial Opening or a Kept Return
An open kitchen is a layout decision, not a trophy. In a split-level house the winning move is often a smaller hole than the one drawn on the Pinterest screenshot, because the wall is doing more than one job in a space that steps.
Three real options, compared candidly.
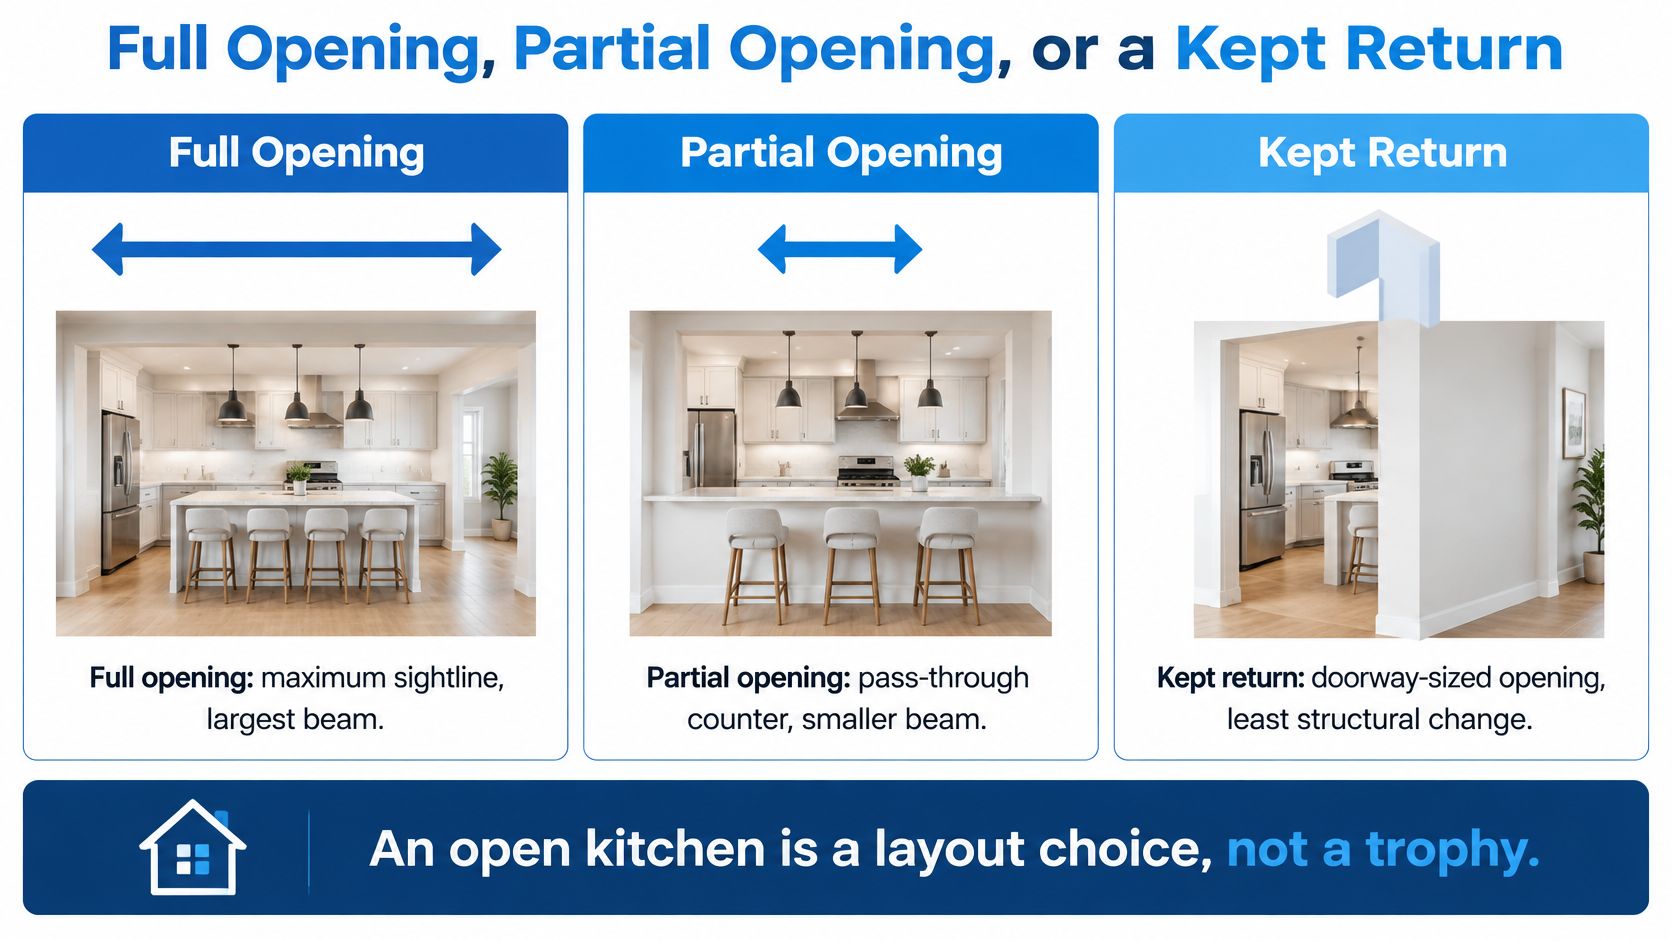
| Option | Structure | Utilities and storage | Choose it when |
|---|---|---|---|
| Full wall removal | No remaining partition; loads must be rebuilt elsewhere | Ducts, pipes, wires, and cabinet landings all have to move | Engineering and the utility map both clear a full opening |
| Structural opening with beam | Posts or piers carry a flush or dropped beam | A soffit or chase can hide one duct; some storage stays | You want sightlines but the span or stair limits a full demo |
| Kept return wall | A short wall stays and may keep some stiffness | Best place to hide a chase and end a cabinet run | A full opening would erase storage or force an expensive relocation |
Full removal takes the partition out so kitchen, dining, and the half-level living room share one view. It wins only when the structure, the ducts, and a landing spot for hot pans can all be solved without a footing saga. A cook loses the wall that held the spice rack, the phone charger, and the spot where a hot sheet pan waited.
A structural opening keeps posts or a short pier and spans the gap with a beam. You get the sightline with a planned place for the load to land, and a pass-through counter can sit on the beam line as a serving surface and a visual edge between cooking and sitting. This is the most common good answer in a raised ranch.
A kept return leaves a stub of wall for a cabinet end, a duct chase, or a little lateral stiffness. It's unglamorous and it saves projects. Done well, the return reads as intentional architecture rather than a wall someone ran out of money to finish.
Fallbacks when the utility map says no
- Narrow the opening so the stack sits inside a thickened jamb instead of mid-span.
- Add a soffit that reroutes one duct along the beam line.
- Relocate a register to free the center of the wall.
- Swap in a peninsula to replace the cabinet landing you lose, and check kitchen island versus peninsula tradeoffs before you commit.
- Build an engineered chase that keeps utilities inside the new kitchen footprint instead of moving them.
Score each option on four things: usable storage, disruption while you're still living in the house, permit complexity, and total project cost. The option that scores worst on storage and best on sightlines is usually the one that disappoints in month six.
A four-foot opening over a weak crawlspace beam can cost more than removing a longer nonbearing partition, because new point loads need posts and possibly a footing.
Choose full removal only after the engineer and the utility map both say yes. Otherwise the partial opening or the kept return is the grown-up version of the open plan, and it's the version you'll still like when the novelty wears off.
Get the Wall Checked Before You Open It
Don't schedule demolition until three things exist on paper. First, a sketch of the load path from roof to foundation, including where the new posts land. Second, a note on whether the wall is part of the seismic system, written by someone licensed to make that call. Third, a utility map showing what stays, what moves, and what can't move at all. If any one of the three is missing, your next dollar goes to an engineer and a contractor walk-through, not to a dumpster.
The walk-through itself should be specific. Someone should confirm joist direction, identify what sits below the proposed posts, and recommend one of the three openings rather than promising all three are fine. Structural work and kitchen finishes need separate lines in the estimate, or the budget stops being honest the moment a footing appears.
Bring three things to that meeting: photos of the attic or crawlspace, any original plans the previous owner left behind, and a list of what you refuse to lose, such as the pantry or a clear path at the stair.
If you're in Orange County or Los Angeles, our team at Epic Remodeling is licensed and insured under CSLB #1095347, and our free in-home consultation is run by a qualified general contractor who helps plan the project, so the structural constraints and the kitchen layout get settled in the same conversation. You can book it through the contact form or by phone.
Get the structural answer, get the permit path in writing, and only then decide how wide the kitchen should open.
Epic Remodeling handles raised ranch kitchen wall removal as part of full kitchen transformations across Orange County and Los Angeles, from preconstruction floor plans and 3D renderings through framing, structural coordination, and finish work, with a dedicated project manager on site from kickoff to completion. If you want the load path, the permit sequence, and the layout decided together before anyone swings a hammer, book a free in-home consultation with Epic Remodeling and start with the wall instead of the cabinets.