Stacked Stone Tiles: Materials, Costs and Design Ideas
Stacked stone tiles explained: what they're made of, how to install them without cracks, what they cost, and where they look best in your home.
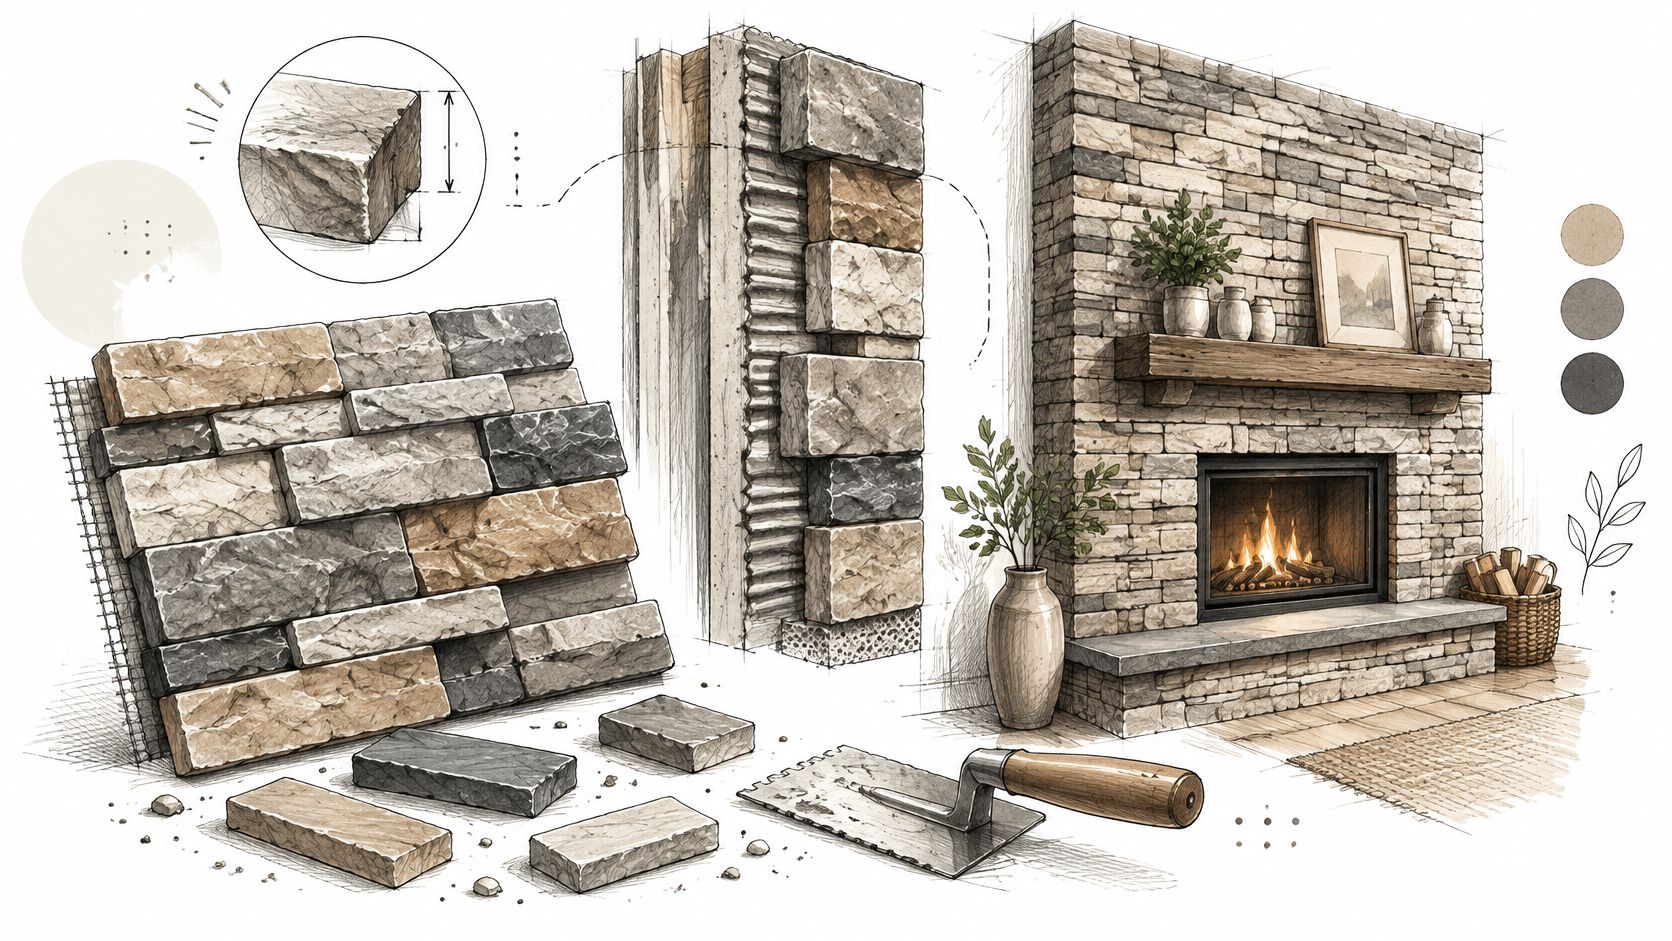
You're standing in the kitchen holding a stone sample against the backsplash. In the showroom, it looked like a cozy hillside cottage. Beside your sink, you're suddenly wondering how you'll wipe spaghetti sauce out of those little ledges, and whether the painted wall can hold it.
That's the right moment to put the sample down and look behind the finish. Stacked stone tiles are decorative cladding, not a shortcut to a stronger or watertight wall. The satisfying part is choosing the color. The money-saving part is matching the product to the substrate, water exposure, and work required before the first piece goes up.
Stacked Stone Tile Types Compared
Stacked stone formats at a glance
| Format | Typical thickness | Best uses | Notes |
|---|---|---|---|
| Traditional thick stone veneer | Approximately 4 to 6 in, as described in this stone veneer technical overview | Full masonry-style cladding | Needs a structure designed to carry it |
| Thin natural stone veneer | Approximately 3/4 to 1-1/2 in, from the same overview | Accent walls, fireplaces, backsplashes | Less stone per visible area; verify actual product weight |
| Composite stone-faced precast panel | Stone facing approximately 3/4 to 1-1/4 in, from the same overview | Building facades using engineered panel systems | Facing thickness isn't total panel thickness |
| Sheet-mounted stacked stone mosaic | Use the selected product's stated overall thickness, including backing | Dry accent walls and manufacturer-approved lightly splashed areas | Thin pieces on mesh backing; approval must cover the intended exposure |
Thin stone is like a made-to-measure suit: less bulk, the same polished look, but it still needs a sturdy frame underneath. Don't assume that a slim profile makes every product suitable for drywall, or that mesh backing makes a mosaic shower-ready.
The formats solve different problems. Traditional veneer creates substantial depth and convincing masonry-style returns, but its support requirements belong in the building design. Thin natural stone veneer gives a remodel that layered appearance without using full-depth pieces.
Composite precast panels are engineered facade components, not oversized backsplash tiles. Sheet-mounted mosaics make small pieces easier to handle together, although the installer still has to disguise sheet boundaries and control alignment.
Compare the whole product, not just the face
Say you're covering an entry wall that ends beside a doorway. A handsome front face won't settle how the exposed edge should look. You'll need a finished return, a compatible corner piece, or a deliberately detailed transition.
Bring samples together with the surrounding materials. A charcoal stone that looks calm against white paint can look surprisingly busy beside heavily veined countertops.
- Check the backing: Confirm that the mesh and its adhesive are approved for the setting material and exposure.
- Inspect the edges: Decide how outlets, outside corners, wall ends, and adjoining trim will finish.
- Get the actual weight: Thickness alone doesn't establish the installed load.
- Check the intended use: A decorative wall product isn't automatically approved for floors, showers, or exterior exposure.
Buying rule: Choose the format by location first. Compare colors and textures only after the installation requirements make sense.
Installation Requirements by Location
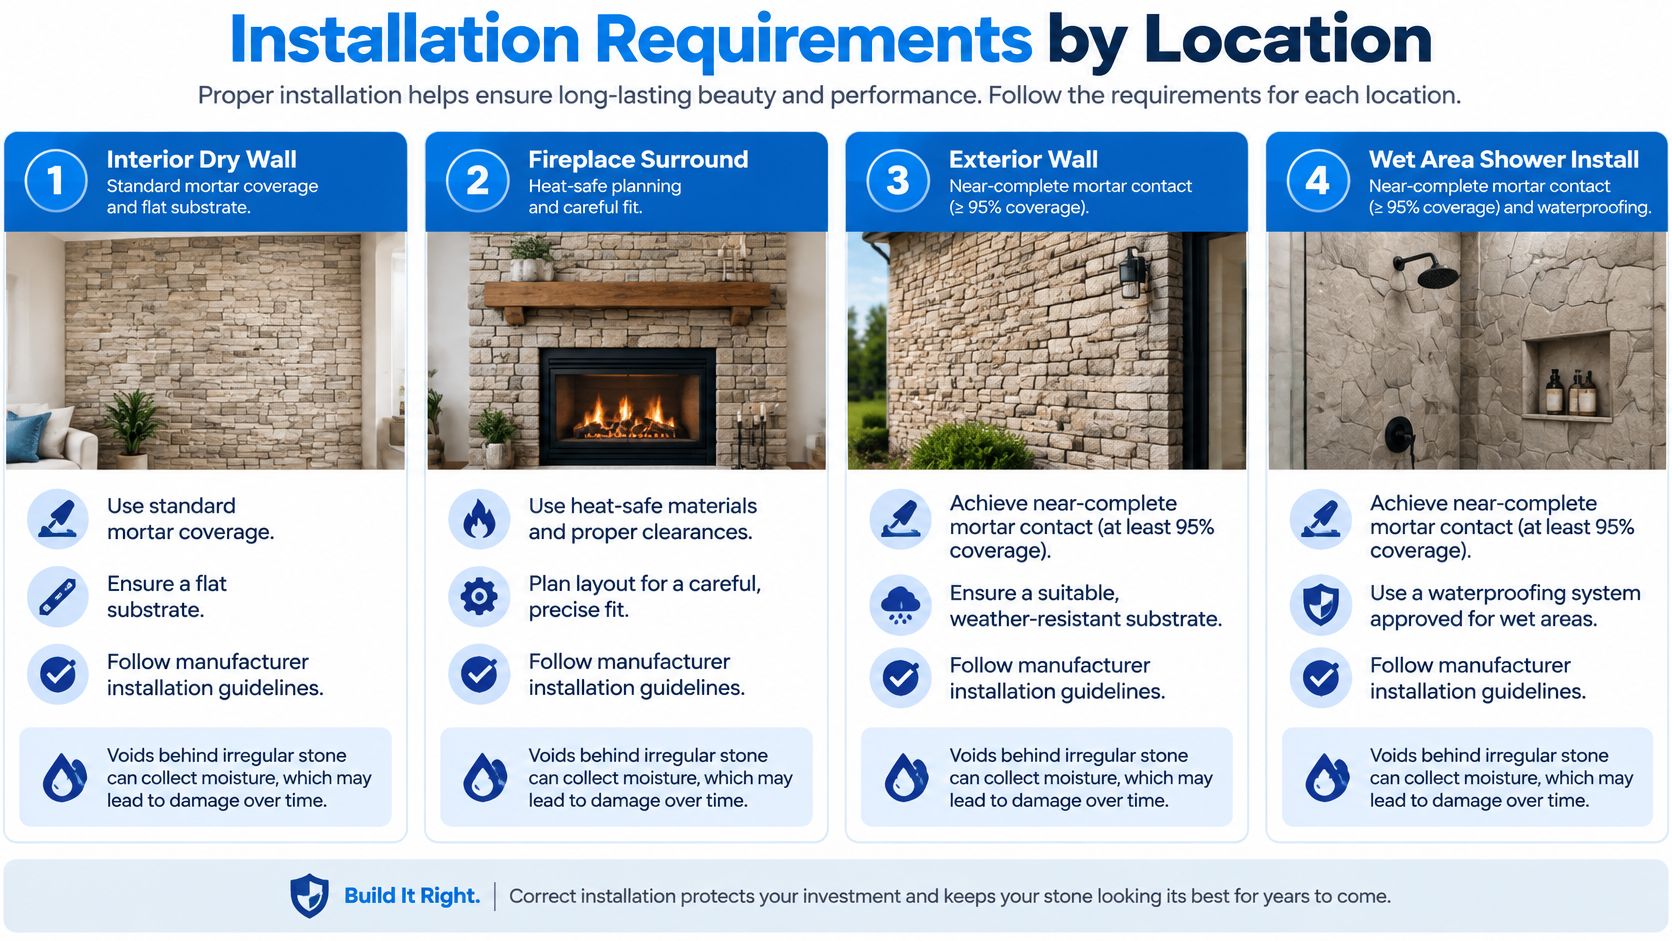
Installation requirements by location
| Location | Mortar coverage | Slope | Movement joint spacing |
|---|---|---|---|
| Dry interior accent wall | Meet the selected stone-and-mortar system's coverage requirement | Flat vertical substrate; no drainage slope on the wall face | Common interior guidance is 20–25 ft each direction, according to the BCA stone installation guide |
| Interior wet area or sun-exposed interior | Near-complete contact in wet areas; confirm the system requirement for dry sun-exposed walls | Slope water-collecting ledges toward drainage | The same guide shortens spacing to about 8–12 ft with sunlight or moisture exposure |
| Exterior wall or outdoor kitchen | At least 95%, under Custom Building Products' exterior installation guidance | Minimum 1/4 in per ft on horizontal exterior surfaces | Approximately 8–10 ft each direction |
| Patio or pool-adjacent wall | Same exterior coverage requirement | Same horizontal exterior drainage requirement | Same exterior spacing guideline, using sealant conforming to ASTM C920 |
These are planning guidelines, not a substitute for the assembly's specifications. Structural joints, changes in substrate, exposure, and the selected installation system can require a different arrangement.
Translate the requirements into a wall that works
On a dry living-room wall, the first questions are support, flatness, and compatibility. A painted surface isn't automatically a suitable bonding surface, and a loose patch of plaster doesn't become sound because you cover it with expensive stone.
Outside or in a wet area, voids behind irregular pieces can collect water and concentrate stresses during temperature changes. The installer should comb mortar consistently, back-butter uneven pieces, and lift freshly installed units periodically to inspect contact.
Movement joints aren't decorative mistakes to conceal. Concrete, framing, render, and stone respond differently to changing conditions; flexible joints give that movement somewhere to occur instead of forcing it through the finish.
A fireplace adds a separate check. Confirm the appliance's clearances and the suitability of the backing, mortar, and finish for the expected heat. Stone around the opening doesn't authorize stone inside the firebox.
Plan for Southern California exposure
A sunny Orange County outdoor kitchen may not face the same freezing conditions as a mountain property, but it still gets hot, cools down, and receives rain or irrigation. Check the cap, countertop junction, and nearby sprinklers, not just the broad face of the wall.
For a bathroom conversion, settle the enclosure and drainage details alongside the finish choice. This tub-to-walk-in-shower planning guide can help you coordinate the larger layout before committing to textured walls.
Before installation, verify:
- Support: The wall assembly can carry the selected finish.
- Drainage: Horizontal surfaces direct water out rather than toward the backing.
- Joint positions: Structural breaks and changes of plane have an appropriate flexible detail.
- Access: Plumbing fittings, outlets, and appliance components remain serviceable.
How to Install Stacked Stone Tile Step by Step
Say the project is an accent wall beside the dining table. You've cleared the furniture, opened the cartons, and discovered that the stone colors aren't evenly distributed. Resist the urge to start sticking pieces up from the nearest box.
The routine below suits planning a backsplash or accent wall. Wet areas, exterior assemblies, and fireplace surrounds need their location-specific details resolved before this work begins.
Prepare before mixing mortar
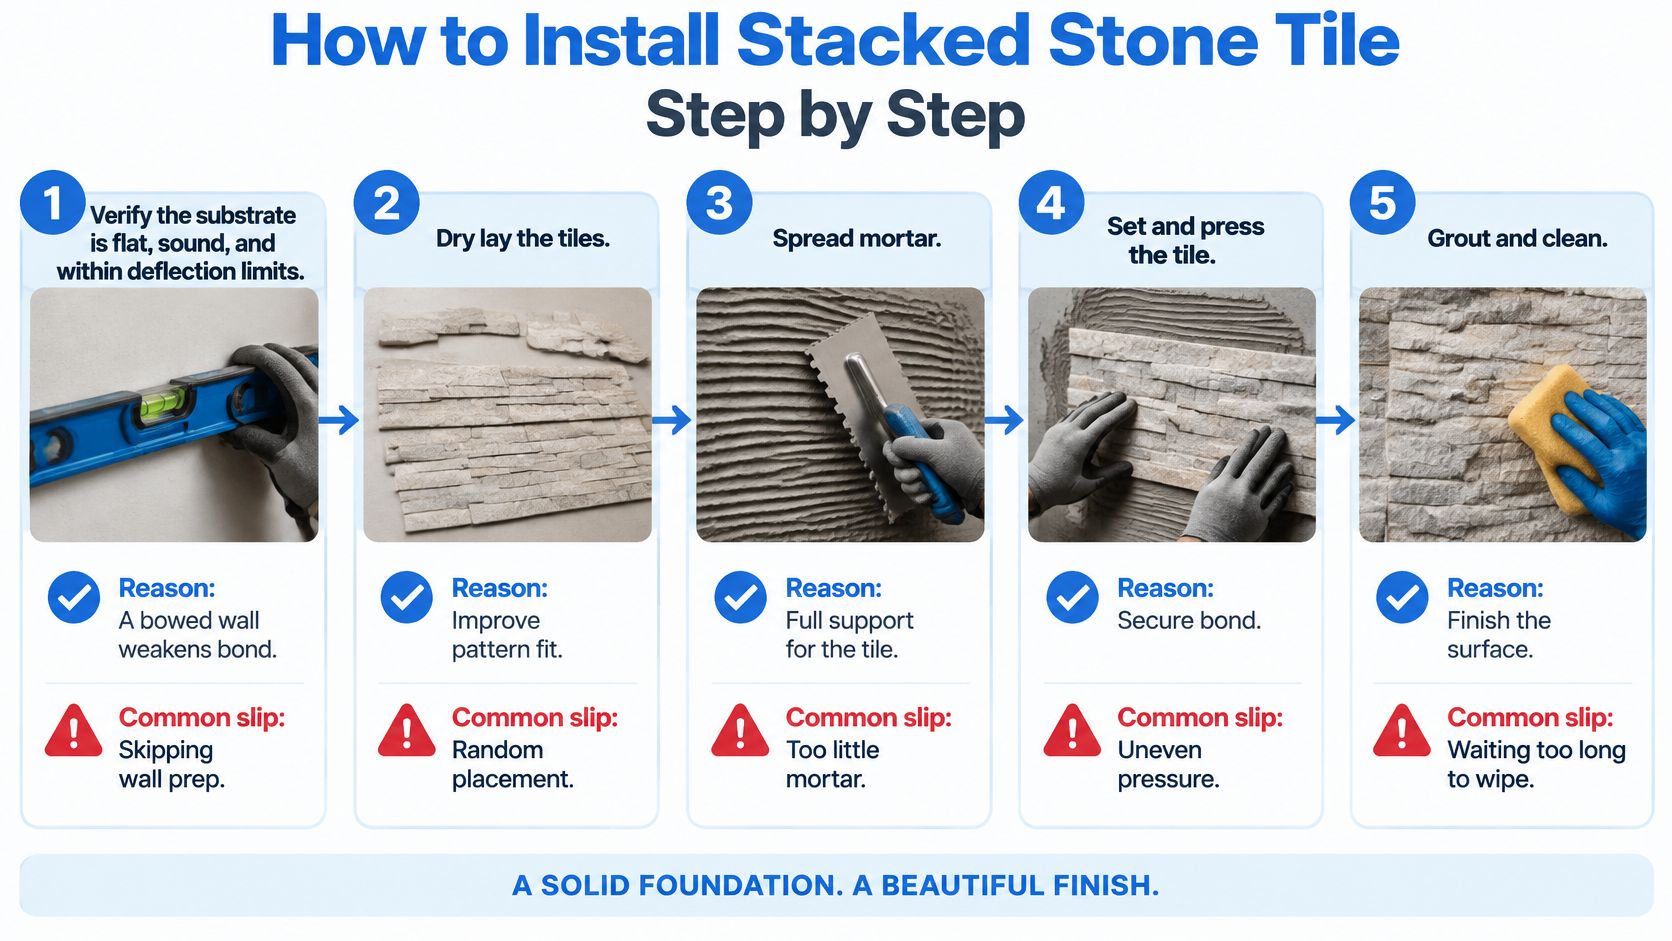
Verify the substrate. Use a straightedge to find bows and humps, then check that the surface is sound, clean, and approved for the assembly. Repair the wall rather than trying to straighten it with thick blobs of setting mortar, and have structural suitability checked where needed.
Map joints and transitions. Mark structural breaks, inside corners, changes of plane, and boundaries between different backing materials. Don't let a convenient tile layout persuade you to bridge a joint that must remain functional.
Dry-lay and establish reference lines. Blend pieces from different cartons on a protected floor, balancing color and avoiding obvious repeated shapes. Mark a level reference with a laser or spirit level, and plan cuts so the finished wall doesn't end with awkward slivers.
Complete waterproofing where required. Install the specified membrane, treating seams, penetrations, and corners as parts of the same system. Respect its curing requirements and complete the applicable checks before concealing it; this is also when any specified stone pre-sealing must be coordinated.
Set, inspect, and finish
Comb mortar consistently. Use mortar approved for the stone, backing, substrate, and exposure, and select a notched trowel that produces the required contact. Back-butter irregular pieces without leaving thick perimeter ridges around an unsupported center.
Bed each piece firmly. Press and gently move the unit into the mortar to collapse the ridges, then check its relationship to neighboring pieces. Natural face texture is intentional; a panel edge sticking out because the backing isn't seated is not.
Lift pieces to inspect coverage. Remove freshly set units periodically and examine both their backs and the mortar bed. It's a lifting test, not a commitment ceremony: taking a piece off now is much cheaper than rescuing it later.
Treat the joints the product has. Grout only systems designed for grouted joints, cleaning carefully before residue hardens on the textured face. Many dry-stack products aren't face-grouted; keep designated movement joints clear and finish them with the specified flexible sealant.
Complete the specified sealing and cleanup. If the stone requires sealing on all sides, that treatment belongs before setting, not as a last-minute rescue after installation. Apply any specified final coat after the appropriate curing and drying period, testing its appearance on spare material first.
A tidy face doesn't prove a good bond. Check mortar contact while you can still lift the stone.
The finished layout should have deliberate edges, balanced color, and consistent alignment without distracting sheet outlines. Hollow sounds or persistent damp patches deserve investigation, but tapping alone can't certify that an assembly is properly bonded or waterproof.
Sealing Myths and Moisture Traps
Sealed does not mean waterproof. A sealer can help reduce staining and absorption at the stone's surface. A waterproofing assembly protects the vulnerable construction behind the finish, with coordinated treatment at corners, penetrations, and drainage points.
Porous stone can reveal moisture from the setting mortar, and moisture-sensitive products may require sealing on all sides before installation followed by another coat after grouting, as explained in TileBar's stacked-tile installation guide. That isn't permission to coat every stone back with any sealer you find: the treatment must remain compatible with the bonding system.
Match the protection to the mess
Consider the backsplash behind a coffee machine. An occasional splash is different from a shower wall that gets soaked every morning, even if you love the same cream-colored stone for both.
- Showers and tub surrounds: Confirm explicit wet-area approval, waterproofing details, and a practical cleaning method. Deep, rough ledges can be an unnecessarily demanding choice.
- Kitchen sink areas: Think about soap, food residue, and repeated splashing. A smoother material directly behind the sink may be the more forgiving partner.
- Fireplace surrounds: Plan for soot and cleaning as well as heat. Don't assume a stain-repellent treatment has any bearing on appliance clearances.
- Exterior veneers: Address rain, irrigation, cap details, and drying conditions together. Repeatedly wetting the same wall can undermine an otherwise sensible material choice.
Read moisture symptoms before adding more product
Darkening during curing can reflect moisture moving through porous stone. White residue may be efflorescence, salts deposited as moisture evaporates; neither symptom should trigger an automatic coating of more sealer.
First establish whether the assembly is drying normally or receiving continuing water. Persistent staining, recurring residue, or dampness concentrated at a junction calls for checking the water source and drainage, not hiding the evidence.
Ask what stone you're buying, how it responds to moisture, what protective assembly sits beneath it, and who verified the slopes. The stone is the last visible layer, not the first line of defense.
What Stacked Stone Costs Over Time
Stacked stone cost and life-cycle reference figures
| Figure | Value | Context |
|---|---|---|
| Quartzite stacked-stone mosaic wall tile, 2025 listing | $52 per box | The Perigold listing covered 2.5 sq ft per box |
| Same tile, calculated price per square foot | $20.80 | Box price divided by coverage; one retailer's listing, not a market average |
| Natural stone life-cycle cost, modeled 40-year service life | USD 92.50 per sq m | Includes maintenance, replacement, and energy in the modeled comparison described in the life-cycle notes associated with Brachot's floor-covering assessment |
| Ceramic tile life-cycle cost, same modeled comparison | USD 138.00 per sq m | Same modeling assumptions, not a stacked-stone wall installation quote |
| Modeled ecological impact, natural stone versus ceramic | About 74% lower | Floor-covering life-cycle assessment, not a universal result for stone walls |
Turn a box price into a project allowance
Start with box price ÷ box coverage. Then calculate the wall area, account for openings and returns, and add an allowance appropriate to the layout's cuts and likely breakage. Round the purchasing quantity up to whole boxes.
Say your backsplash turns a corner, wraps a window, and stops beneath cabinets. It can require more cutting and edge work than a plain rectangular accent wall with a similar visible area. That's why comparing tile prices alone can make the harder project look deceptively cheap.
Ask for a written estimate that separates:
- Finish materials: Flats, corner pieces, trim, and spare material.
- Wall preparation: Removal, repair, flattening, and any required backing changes.
- Installation materials: Mortar, waterproofing, joint materials, and compatible sealer.
- Labor and logistics: Layout, cutting, installation, protection, transport, and disposal.
A broader bathroom remodel estimate guide can help you place the stone allowance within the surrounding plumbing, enclosure, and finish work.
Read long-term claims without buying the sales pitch
Floor-covering life-cycle models are useful context, but they don't price your fireplace or shower. Quarry distance, product thickness, backing, adhesive, maintenance, and eventual removal can change the outcome.
Budget safeguard: Compare complete installed assemblies, not a premium tile price against a bare-material alternative.
Long service life only helps if you keep the installation. A carefully detailed feature wall you still like years later is a different proposition from an elaborate finish demolished during the next redesign.
Request product thickness, maintenance instructions, quarry or transport information, and an explanation of the proposed assembly. Spend on sound preparation before spending on a larger expanse of stone. Repairing water-damaged backing behind a beautiful finish isn't a maintenance plan anyone wants.
Pick the Right Design Use Before You Buy
Stacked stone adds texture the way a statement necklace does. It works best when everything around it isn't also trying to be the loudest thing in the room.
Say your living room already has patterned upholstery, open shelving, and a strongly veined hearth. A quieter stone with shallow relief may give you the warmth you want without turning the fireplace into another visual argument.
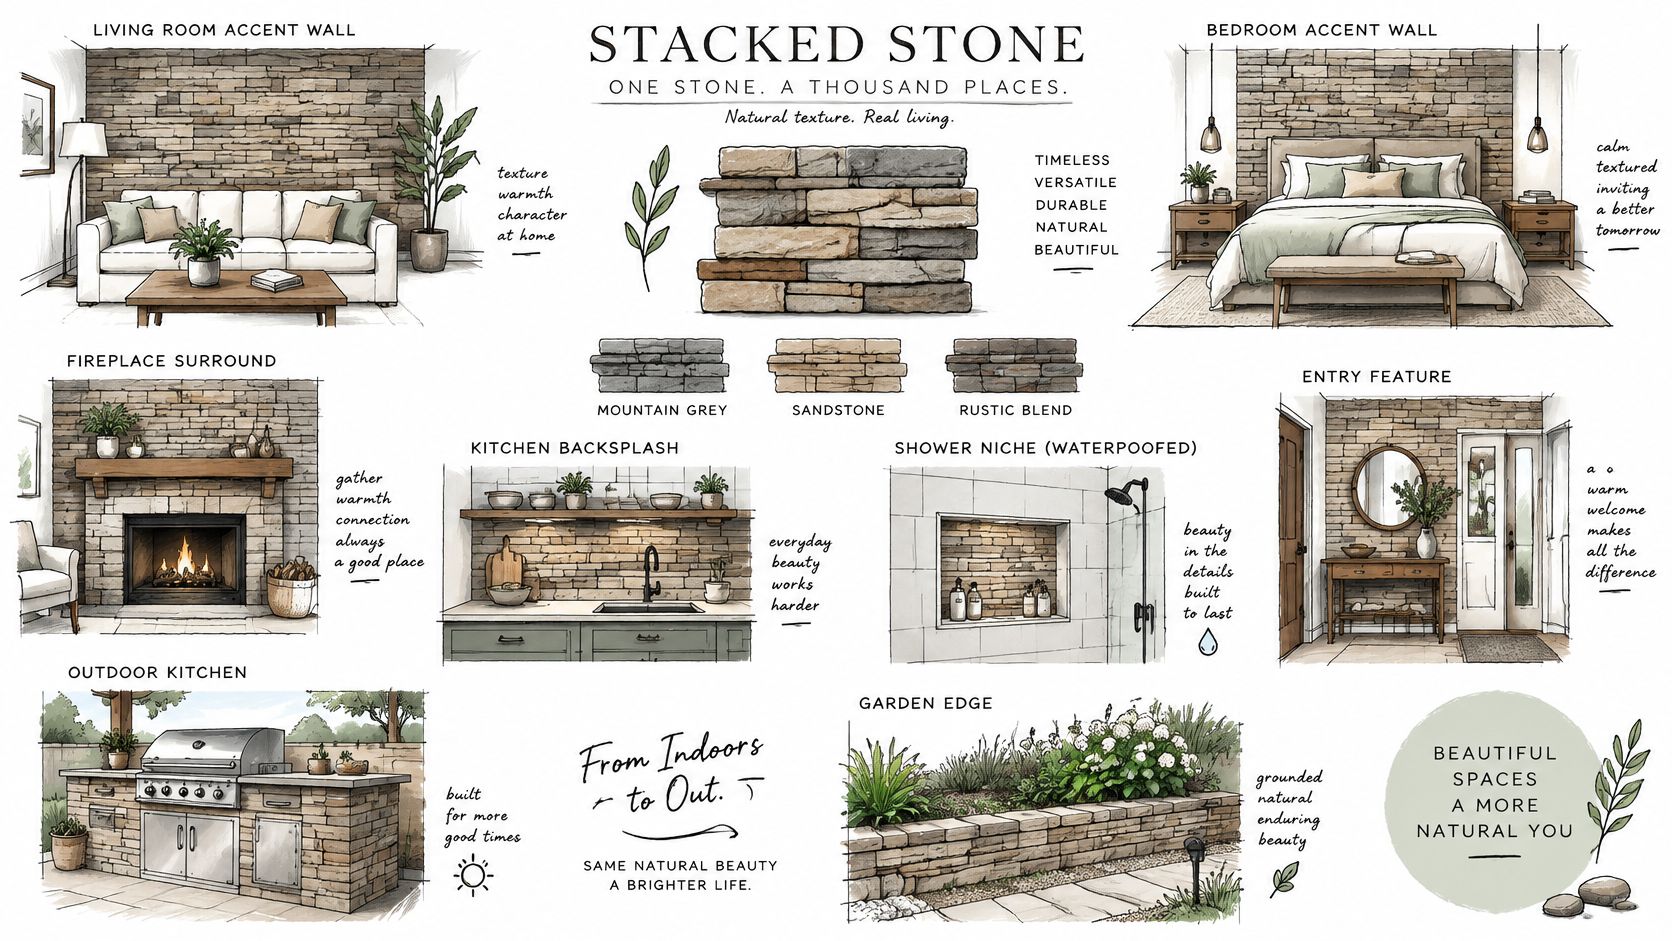
Give each location a clear job
An accent wall behind a sofa or bed can add depth without taking over the whole room. Check furniture placement first, including whether rough projecting pieces will sit where someone leans, brushes past, or reaches for a switch.
A fireplace surround benefits from deliberate corners and returns. Resolve the mantel, appliance access, adjacent cabinetry, and heat clearances before choosing a dramatic full-height layout.
A kitchen backsplash needs a cleaning strategy as much as a color scheme. Use substantial texture in a relatively dry feature area, and consider a smoother companion surface where cooking grease and sink splashes are frequent visitors.
For a shower niche, don't confuse a small area with a simple installation. Waterproofing, drainage, exposed edges, product approval, and cleaning access all matter. Comparing bathroom remodel designs can help you decide whether the texture belongs inside the enclosure or on a drier adjacent wall.
An entry feature should look intentional at its ends and around door trim. Test lighting on the sample, because grazing light emphasizes both attractive relief and poorly aligned panel edges.
An outdoor kitchen or garden wall needs coordinated caps, drainage, transitions, and movement accommodation. The decorative facing doesn't take over the retaining or structural work of the wall beneath it.
Make the choice practical enough to keep
Commercial spaces need the same discipline. A restaurant feature wall can create atmosphere away from food splashes, while a medical waiting-room feature should be assessed for cleanability and contact with chairs, carts, and people.
Before ordering, settle these questions:
- Exposure: Is this a dry wall, a splashed surface, or a regularly wet assembly?
- Support: Can the existing construction carry and properly receive the finish?
- Ownership: Are the installed budget and ongoing cleaning acceptable?
Have a licensed contractor review the substrate, transitions, and joint layout before you commit to material. In Orange County, we're licensed and insured at Epic Remodeling, with CSLB #1095347, and we design projects to the client's budget. A convincing sample is a good start; a buildable plan is what turns it into a wall worth keeping.
Our Preconstruction Design includes interior and exterior floor plans and 3D visualization renderings, so you can see how stacked stone fits the room before construction begins. Visit Epic Remodeling to discuss your wall's exposure and substrate, explore the design, and request a written estimate shaped around your budget.